
THE KEY COMPONENTS:
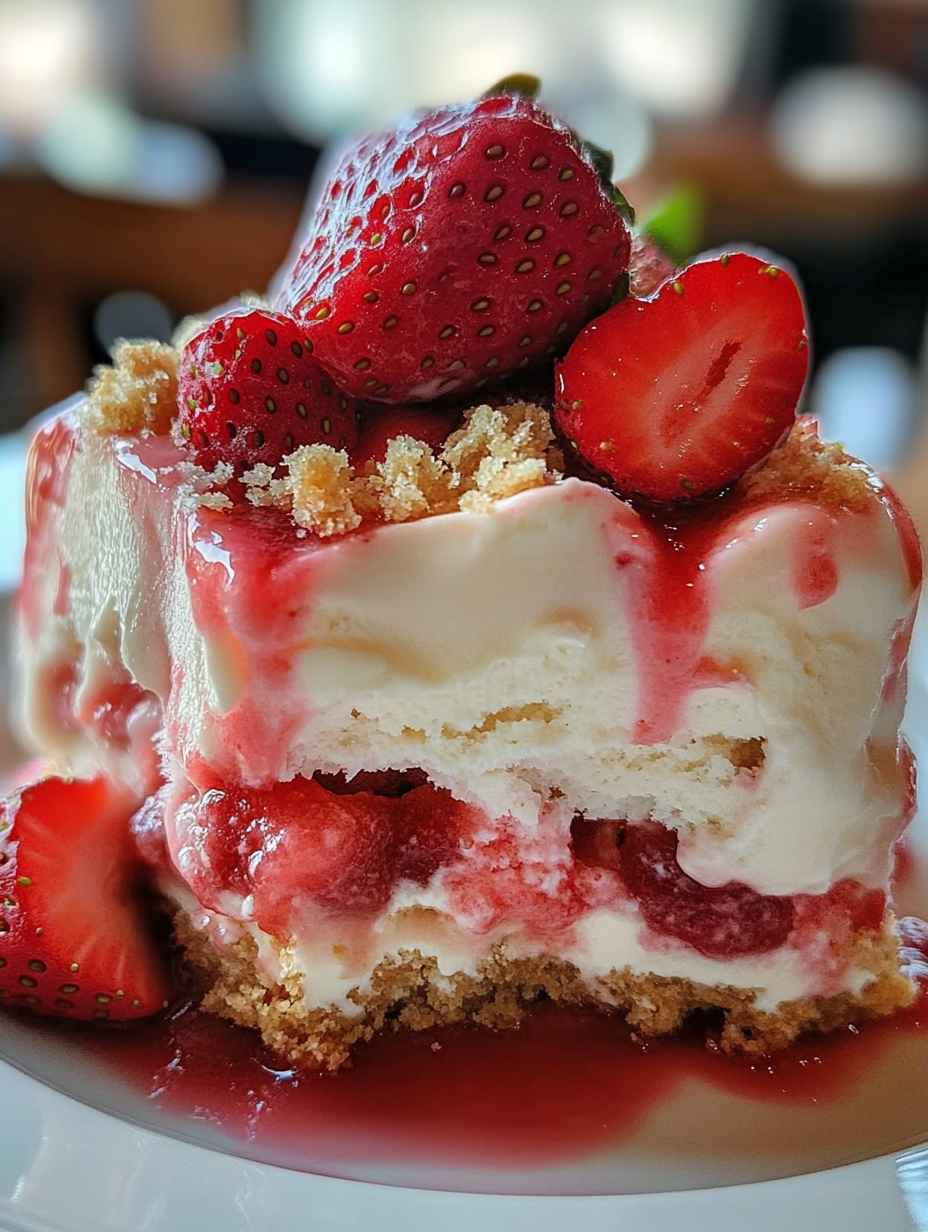
- premium strawberry ice cream – forms the creamy base of our dessert. Look for a high-quality brand that uses real strawberries for the best flavor. The creamier the ice cream, the more luxurious your finished cake will be!
- vanilla cookie crumbs – create that wonderful textural contrast and buttery flavor that elevates this beyond a simple bowl of ice cream. Crushing them to a somewhat coarse texture (rather than super fine) provides the best eating experience.
- fresh strawberry sauce – this homemade component makes all the difference! The concentrated berry flavor and stunning color create beautiful layers throughout the cake and bring that fresh-picked strawberry taste that makes this dessert so special.
- heavy cream – adds richness to the sauce and helps it freeze with a perfect consistency that complements the ice cream. It also prevents the sauce from becoming too icy when frozen.
- simple garnishes – freshly whipped cream and sliced berries aren’t just pretty – they add another dimension of texture and flavor when serving. The contrast of the fresh berries against the frozen cake is particularly delightful!
CREATING YOUR ICE CREAM MASTERPIECE
Begin by preparing your homemade strawberry sauce, which needs time to cool completely before assembly. In a medium saucepan, combine your frozen strawberries with sugar and water, bringing everything to a gentle simmer. The frozen berries will slowly break down as they cook, releasing their vibrant color and flavor.
After about 10 minutes of simmering, when the berries have softened completely, it’s time to transform the mixture into a smooth sauce. An immersion blender makes this super easy, but you can also transfer the mixture to a standard blender or food processor. For a more rustic texture, simply mash everything with a potato masher.
The magic ingredient that transforms this from simple strawberry puree to luxurious sauce is a mixture of heavy cream and cornstarch. This combination creates the perfect consistency – not too runny, not too thick – and prevents the sauce from freezing solid. Whisk these two ingredients together until smooth, then stir into your simmering berry mixture.
Transfer your finished sauce to a bowl and allow it to cool completely at room temperature. Patience is key here – using warm sauce will melt your ice cream during assembly. You can speed up the cooling process by placing the bowl in the refrigerator or even giving it a quick chill in the freezer.
About 30-40 minutes before assembly, take your ice cream out to soften slightly. You’re looking for a consistency that’s easy to spread but not melting – similar to soft-serve ice cream.
While waiting for the ice cream to soften, prepare your cookie layer. Mix the vanilla cookie crumbs with melted butter until they resemble wet sand and can hold together when pressed. This butter-to-crumb ratio is important – too little butter and your crust will be crumbly when served, too much and it becomes greasy.
Line a springform pan with parchment paper on the bottom for easy removal later. This simple step saves a lot of frustration when it’s time to serve! Press half of your cookie mixture firmly into the bottom of the pan, creating an even layer. Using the bottom of a measuring cup helps achieve a smooth, compact base.
Now for the layering magic! Spread half of your softened ice cream over the cookie base, using an offset spatula to create an even layer. Work relatively quickly to prevent excessive melting. Next, drizzle half of your cooled strawberry sauce over the ice cream, creating beautiful swirls of color.
Repeat these layers once more: remaining cookie mixture (press gently), the rest of the ice cream, and finish with a final drizzle of strawberry sauce on top. Don’t worry if your springform pan is looking quite full – that’s expected!
The most important step now is freezing. Place your creation on a flat surface in your freezer for at least 8 hours, preferably overnight. This extended freezing time allows all the layers to set properly and flavors to meld together beautifully.
When you’re ready to serve, remove the cake from the freezer and let it stand at room temperature for 10-15 minutes. This brief thawing makes slicing much easier and allows the flavors to bloom. Carefully remove the sides of the springform pan to reveal your gorgeous creation!
For an extra special presentation, whip some heavy cream with a touch of vanilla and sugar, then pipe decorative swirls around the edge. Add fresh strawberry halves and perhaps a light dusting of crushed cookies for a professional-looking finish that will have everyone reaching for their phones to take pictures before diving in!
Ingredients
Berry Sauce:
- 1 pound 450g frozen strawberries
- 3/4 cup 150g granulated sugar
- 1/3 cup water
- 1/3 cup heavy whipping cream
- 1 1/2 tablespoons cornstarch
Cake Assembly:
- 2 1/2 cups vanilla cookie crumbs about 8 oz/225g cookies
- 6 tablespoons 85g unsalted butter, melted
- 1.5 quarts 1.4L premium strawberry ice cream
- 1/2 teaspoon vanilla extract optional, to enhance flavor
Optional Decoration:
- 1 cup heavy whipping cream
- 3 tablespoons powdered sugar
- 1/2 teaspoon vanilla extract
- 6-8 fresh strawberries halved
- 2 tablespoons cookie crumbs for sprinkling
Instructions
For the Berry Sauce:
-
Combine frozen strawberries, sugar, and water in a medium saucepan over medium heat. Bring to a simmer, stirring occasionally.
-
Cook for 8-10 minutes until berries are completely softened and beginning to break down.
-
Use an immersion blender to puree the mixture until smooth (or transfer carefully to a standard blender).
-
In a small bowl, whisk together heavy cream and cornstarch until completely smooth with no lumps.
-
While still simmering, slowly pour the cream mixture into the strawberry sauce, whisking constantly.
-
Continue cooking for 2 minutes until sauce thickens slightly. Remove from heat and transfer to a bowl.
-
Allow sauce to cool completely to room temperature before using (refrigerate to speed up the process if needed).
For Assembly:
-
Remove ice cream from freezer 30-40 minutes before assembly to soften.
-
Prepare a 9-inch springform pan by lining the bottom with parchment paper.
-
In a medium bowl, thoroughly mix vanilla cookie crumbs with melted butter until evenly moistened.
-
Press half of the crumb mixture firmly into the bottom of the prepared pan, creating an even layer.
-
Carefully spread half of the softened ice cream over the crumb layer. If ice cream becomes too soft during this process, return everything to the freezer for 15 minutes before continuing.
-
Drizzle half of the cooled strawberry sauce over the ice cream layer. Use a knife to gently swirl it slightly if desired.
-
Sprinkle remaining crumb mixture over the sauce, pressing down very gently.
-
Top with remaining ice cream, spreading into an even layer.
-
Finish with remaining strawberry sauce, creating decorative swirls on top.
-
Cover with plastic wrap (not touching the surface) and freeze for at least 8 hours or overnight until completely firm.
To Serve:
-
Remove cake from freezer and let stand at room temperature for 10-15 minutes before serving.
-
Carefully remove the sides of the springform pan.
-
If desired, whip heavy cream with powdered sugar and vanilla until stiff peaks form, then pipe decoratively around the edges of the cake.
-
Garnish with fresh strawberry halves and a sprinkle of cookie crumbs.
-
Slice with a knife warmed under hot water and wiped dry between cuts.
Notes
- For easier spreading, soften ice cream in the refrigerator rather than at room temperature – it melts more evenly and gives you more working time.
- Create a more complex flavor profile by adding 1/4 teaspoon of almond extract to your cookie crumb mixture.
- For a prettier presentation, reserve about 1/4 cup of sauce and place it in a squeeze bottle to create more precise drizzles on top.
- If you’re serving in very hot weather, place your serving plates in the freezer before plating slices to prevent quick melting.
- This dessert can be stored in the freezer for up to one month if wrapped tightly in plastic wrap after the initial freeze. Always thaw for 10-15 minutes before serving.
