
Step 3: Add the Batter to the Dish
Once the butter is melted, carefully remove the baking dish from the oven. Pour the batter directly over the melted butter. Do not stir. This layering is key to creating the cobbler’s signature texture—the batter will rise to the top as it bakes.
Step 4: Layer the Bananas
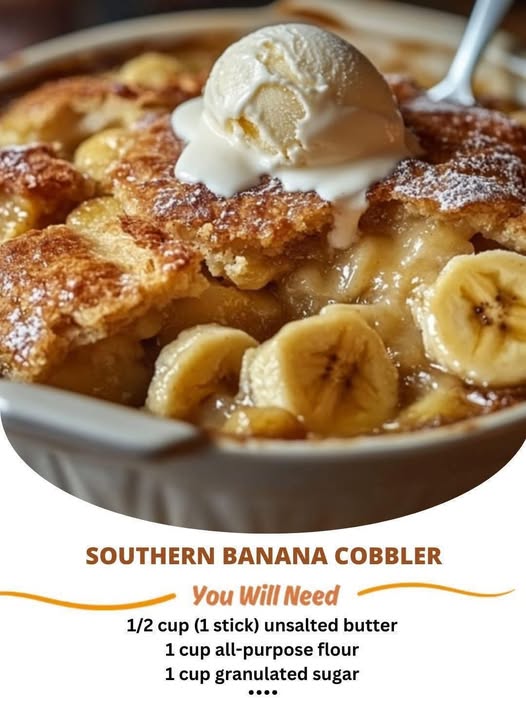
Slice your ripe bananas and layer them evenly over the batter in the baking dish. The sweetness and softness of ripe bananas create the perfect filling for this comforting dessert.
Step 5: Add Sweetness and Spice
Sprinkle brown sugar evenly over the bananas, then dust the top with cinnamon if you like an extra warm spice note. This topping will caramelize during baking, giving the cobbler a rich, golden finish.
Step 6: Bake Until Golden
Place the baking dish back in the oven and bake for 40 to 45 minutes, or until the cobbler is golden brown and bubbling around the edges. The batter will puff up around the bananas, forming a cake-like crust that contrasts beautifully with the tender fruit.
Step 7: Serve Warm
Once baked, let the cobbler cool for about 5 to 10 minutes before serving. Spoon it into bowls and top with vanilla ice cream, whipped cream, or even a drizzle of caramel sauce for an extra-indulgent treat.
Tips for Banana Cobbler Success
- Use Ripe Bananas: The riper the bananas, the sweeter and more flavorful your cobbler will be. Bananas with brown spots are perfect.
- Don’t Stir the Layers: Resist the urge to stir the batter and bananas once poured. This is what allows the cobbler to develop its signature layered texture.
- Let It Rest After Baking: Giving the cobbler a few minutes to cool allows it to set slightly, making it easier to serve without falling apart.
- Add Nuts for Crunch: Want a bit of texture? Add chopped pecans or walnuts on top before baking for a Southern-style crunch.
- Experiment with Flavor: A dash of nutmeg or even a splash of bourbon in the batter can add depth and warmth.
Serving and Storage Tips
Serving Suggestions:
- Warm with Ice Cream: A scoop of vanilla or butter pecan ice cream is the ultimate pairing.
- With Whipped Cream: A simple whipped topping adds lightness to the rich cobbler.
- Drizzled with Caramel: For special occasions, caramel sauce elevates this dessert even more.
Storage:
- Refrigerate: Store leftovers in an airtight container in the refrigerator for up to 3 days.
- Reheat: Warm individual servings in the microwave for about 30 seconds or place the whole dish in a 300°F oven for 10 minutes.
- Freezing Not Recommended: Due to the high moisture content of bananas, this cobbler does not freeze well. It’s best enjoyed fresh or within a couple of days.
Frequently Asked Questions (FAQs)
1. Can I use unripe bananas for this recipe?
It’s not recommended. Unripe bananas are too firm and lack the natural sweetness needed for this dish. Fully ripe, soft bananas provide the best texture and flavor.
2. Can I add other fruits to this cobbler?
Yes! Bananas pair well with fruits like blueberries, strawberries, or even peaches. Just don’t overload the dish, as excess moisture can affect the bake.
3. What’s the best substitute for brown sugar?
If you’re out of brown sugar, you can use white sugar with a little molasses added (about 1 tablespoon per 1/2 cup), or just use granulated sugar if needed.
4. Can I make this ahead of time?
You can prepare the batter and slice the bananas in advance, but it’s best to bake the cobbler right before serving. The texture is best when freshly baked.
5. Can I make this recipe dairy-free?
Absolutely! Use a dairy-free butter alternative and plant-based milk such as almond or oat milk. The results will still be deliciously comforting.
Conclusion
This Southern Banana Cobbler is the perfect example of what makes Southern desserts so beloved—comfort, simplicity, and loads of flavor. With minimal effort and just a handful of pantry ingredients, you can create a dessert that feels like a warm embrace in every bite.
Whether you’re serving it at a family gathering, potluck, or casual weeknight dinner, this cobbler will become a fast favorite. Don’t forget the ice cream on top—it’s the final touch that takes it over the top.
