
Step 2: Cream Together the Butter and Peanut Butter
In a large mixing bowl, combine the softened butter and creamy peanut butter. Use a hand mixer or stand mixer to beat them together on medium speed for about 2–3 minutes until the mixture is smooth and fluffy.
Step 3: Add Vanilla and Gradually Incorporate Powdered Sugar
Mix in the vanilla extract until fully incorporated. Then, begin adding powdered sugar, one cup at a time, blending thoroughly after each addition. The mixture will gradually turn from creamy to a firm, slightly crumbly dough. The consistency should resemble cookie dough—firm yet pliable.
Step 4: Form the Peanut Butter Balls
Scoop tablespoon-sized portions of the dough and roll them between your palms to form smooth, round balls. Place each ball onto the parchment-lined baking sheet, leaving some space between them to prevent sticking. This process should take about 15–20 minutes.
Step 5: Chill the Peanut Butter Balls
Place the baking sheet in the refrigerator and allow the peanut butter balls to firm up for at least 30 minutes. Chilling is a key step to ensure the balls hold their shape when dipped into the warm chocolate.
Step 6: Melt the Chocolate
While the peanut butter balls chill, melt your chocolate chips. You can do this in the microwave by heating in 30-second increments, stirring each time, until fully melted and glossy. Alternatively, use a double boiler on the stovetop for even heating.
Step 7: Dip Each Ball in Chocolate
Once chilled, take the peanut butter balls from the fridge. Using a fork or candy-dipping tool, carefully dip each ball into the melted chocolate, ensuring full coverage. Allow excess chocolate to drip back into the bowl, then place the dipped balls back onto the parchment-lined sheet.
Step 8: Final Chill
Return the sheet to the refrigerator for another 15–20 minutes to allow the chocolate coating to harden and set, creating a glossy, perfect finish.
Presentation and Serving Suggestions 🎉🎁
Once your no-bake peanut butter balls have set, you can present them however you like:
-
Holidays: Add festive sprinkles or colored sugar for a cheerful touch.
-
Gift Boxes: Wrap them in decorative candy wrappers or place them in tins to share with loved ones.
-
Buffet Table: Pair them with other bite-sized treats like fudge squares or truffles for an appealing dessert spread.
These treats will certainly impress no matter how you present them.
Storage and Make-Ahead Tips 🧊
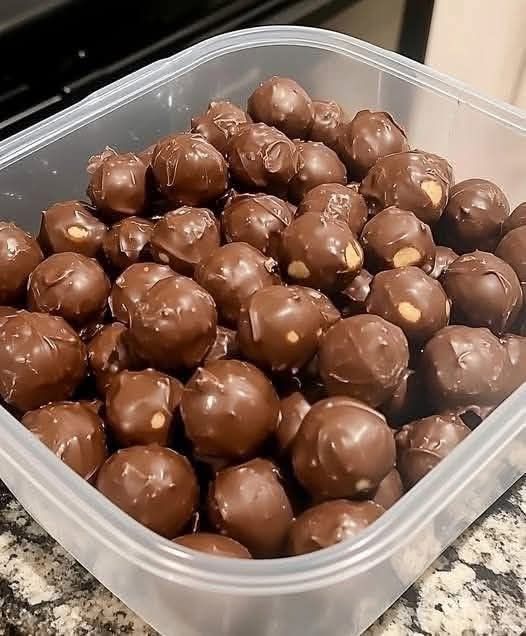
One of the best aspects of these peanut butter balls is their excellent shelf life. They stay fresh for up to two weeks in an airtight container in the refrigerator. If you want them to last even longer, freeze them in a single layer inside a freezer-safe container or bag. They’ll keep for up to three months. When you’re ready to enjoy, simply thaw them overnight in the fridge.
A Sweet Success: Why These Peanut Butter Balls Work 💖
You don’t need elaborate equipment or hours of prep time to make an amazing dessert. With just a few pantry staples, a simple dough, and a chocolate coating, you can create confections that rival those from fancy candy shops. These no-bake peanut butter balls are also customizable—swap out the chocolate variety, sprinkle some sea salt, or add crushed nuts for a fun twist.
These treats are perfect for sharing at your next event or for indulging in a personal moment of sweetness. So go ahead—embrace simplicity and savor the pleasure of a delicious no-bake peanut butter ball.
