
See more on the next page
Aesthetics: A shiny cooktop gives your kitchen a welcoming and polished look – who doesn’t love that?
Step 1: Safety First – Turn Everything Off
Before we begin, let’s make sure you’re safe! Turn off the cooktop completely and let the burners cool. If you have a gas stove, it’s advisable to turn off the gas supply for safety reasons. Trust me, safety comes first!
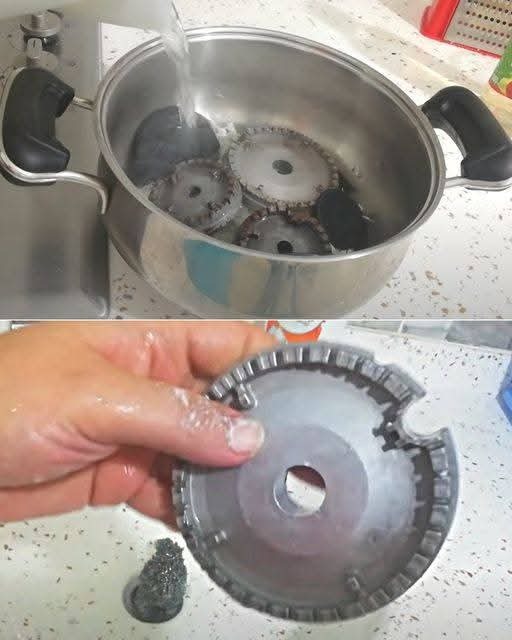
Step 2: Remove and Soak the Burners
Let’s get to work! Carefully lift the grates, lids, and burner heads. Most parts are easy to remove. Fill your sink or basin with warm water and a few drops of dish soap; this will remove any stubborn dirt. Let the parts soak for 20 to 30 minutes and let the magic happen!
Step 3: Brush off the dirt
After soaking, thoroughly scrub each piece with a soft scrub brush, an old toothbrush, or a sponge. For delicate, stubborn stains or burnt areas, sprinkle a little baking soda and a few drops of vinegar on the affected area. Watch it fizz and bubble—it’s like a mini science experiment! Let it sit for a minute, then gently massage it in. Avoid using steel wool or harsh chemicals, which can scratch or damage the surface. We want to clean, not create more problems!
Step 4: Clean the Burner Ports
This step is crucial: make sure the flames are even and efficient! Carefully clean the burner ports using a toothpick, pin, or small wire brush. Be gentle; you don’t want to enlarge or damage the ports. This is especially important for gas burners, as clean orifices ensure good flame distribution. Continued on next page
Step 5: Rinse, Dry, and Reassemble
Once everything is perfectly clean, it’s time to rinse! Rinse all parts thoroughly with clean water and dry them thoroughly with a clean cloth or paper towel. It’s essential to avoid moisture buildup, as it can interfere with ignition and even cause rust. Once everything is dry, reassemble the burner parts and place them on the stovetop. And there you have it, your cooktop is looking great!
Bonus tip: Maintain your cooktop regularly.
To maintain its shine and prevent excessive dirt buildup, wipe it down after each use. A quick daily cleaning will save you time and effort in the long run, while ensuring optimal performance from your burners. For a more thorough cleaning, repeat the above method weekly. Your smokers will thank you!
