
Step-by-Step Instructions
Step 1: Preheat Your Oven
Preheat your oven to 400°F (200°C) . Line a baking sheet with parchment paper to prevent sticking.
Step 2: Prepare the Filling
In a mixing bowl, combine the diced ham, shredded cheese, Dijon mustard (if using), and a pinch of freshly ground black pepper. Mix well to ensure everything is evenly distributed.
Step 3: Roll Out the Puff Pastry
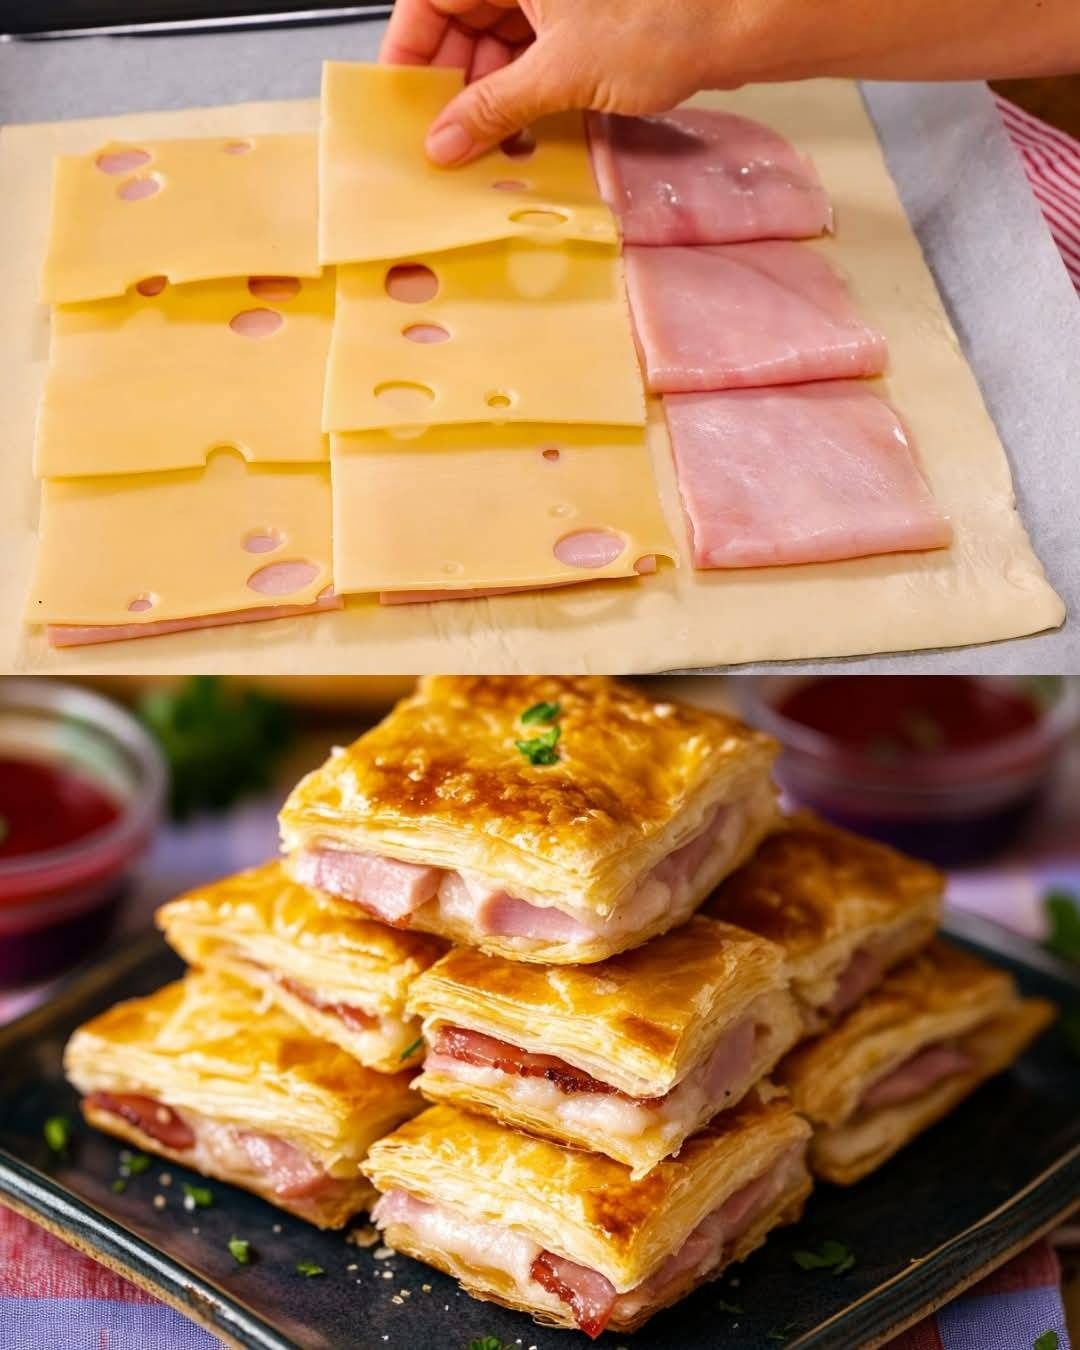
On a lightly floured surface, gently roll out the thawed puff pastry sheet until it’s about 1/8 inch thick. Use a sharp knife or pizza cutter to cut the sheet into squares (approximately 4×4 inches). This should yield around 6–8 squares, depending on the size.
Step 4: Assemble the Pockets
- Place one square of puff pastry on your work surface.
- Spoon about 1–2 tablespoons of the ham and cheese mixture onto the center of the square.
- Lightly brush the edges of the pastry with the beaten egg mixture (this acts as “glue” to seal the pocket).
- Fold the square in half to form a triangle, pressing the edges firmly to seal. Use a fork to crimp the edges for a decorative finish.
Step 5: Arrange on Baking Sheet
Place the assembled pockets on the prepared baking sheet, leaving about 1 inch of space between each one to allow for expansion during baking.
Step 6: Brush with Egg Wash
If desired, lightly brush the tops of the pockets with the remaining egg wash. This gives them a beautiful golden sheen when baked.
Step 7: Bake Until Golden Brown
Bake the pockets in the preheated oven for 18–22 minutes , or until they’re puffed up and golden brown. Remove from the oven and let them cool slightly before serving.
Tips for Success
- Thaw Puff Pastry Properly : Thaw the puff pastry in the refrigerator overnight or at room temperature for about 30 minutes. Avoid over-thawing, as this can make the pastry too soft and difficult to handle.
- Don’t Overfill : Be careful not to overload the pockets, as this can cause them to burst open during baking.
- Seal Tightly : Press the edges firmly and use a fork to crimp them for a secure seal.
- Customize Fillings : Experiment with different cheeses, meats, or seasonings. Try adding spinach, sun-dried tomatoes, or caramelized onions for extra flavor.
Serving Suggestions
These Ham and Cheese Puff Pastry Pockets pair wonderfully with a variety of accompaniments:
- Serve them warm as an appetizer with a side of marinara sauce or spicy ketchup for dipping.
- Add them to a charcuterie board alongside crackers, fresh fruit, and other savory snacks.
- Pack them in lunchboxes for a portable and satisfying meal.
- Pair them with a crisp salad or soup for a light yet filling dinner.
Customization Ideas
While the classic combination of ham and cheese is always a winner, feel free to mix things up with these variations:
- Vegetarian Option : Replace the ham with sautéed mushrooms, roasted red peppers, or caramelized onions.
- Spicy Kick : Add a dash of cayenne pepper or hot sauce to the filling for a fiery twist.
- Herb Infusion : Mix in chopped fresh herbs like thyme, rosemary, or parsley for added fragrance.
- International Twist : Swap the ham for prosciutto and add arugula for an Italian-inspired version.
FAQs About Ham and Cheese Puff Pastry Pockets
Q: Can I freeze these pockets?
A: Absolutely! After assembling the pockets, place them on a baking sheet and freeze until solid. Then transfer them to a freezer-safe bag or container. Bake directly from frozen, adding a few extra minutes to the cooking time.
Q: What if I don’t have puff pastry?
A: While puff pastry is the best option for achieving that flaky texture, you could substitute with phyllo dough or crescent rolls for a similar effect.
Q: How long do these pockets stay fresh?
A: Store leftovers in an airtight container at room temperature for up to 2 days or refrigerate for up to 5 days. Reheat in the oven or microwave before serving.
Conclusion
Ham and Cheese Puff Pastry Pockets are the ultimate fusion of convenience and elegance. Their rich, savory filling wrapped in a golden, flaky crust makes them irresistible to anyone who tries them. By following our detailed recipe and expert tips, you’ll be able to whip up these delightful bites with ease and confidence.
So gather your ingredients, preheat your oven, and enjoy the satisfaction of creating something truly special. Happy baking—and happy snacking!
